Consistency in your documentation presents a polished, professional image for
your clients. Small to medium-size firms sometimes find that creating consistent
materials can be a troublesome task, though. Macros can help make this job
easier. If you frequently send out Microsoft
Excel spreadsheets, for example, you can create a handy macro to make
consistent headers and footers. Here’s how it works.
Creating the Excel macro
Check your version
These instructions were created using Microsoft Excel 2000. If you're using a
different version, the directions may vary.
To create a macro that inserts headers and footers:
- Open a new Excel workbook.
- From the Tools menu, choose
Macro | Record New Macro.
- In the Macro Name text box,
type a name for your macro (see Figure A). Remember, macro names
cannot include spaces or special characters. For this article, I'll call the
macro HeaderFooter.
|
Figure A
|
|
|
- Choose Personal Macro Workbook
from the Store Macro In drop-down list and click OK. A small Macro toolbar
will appear on your spreadsheet. From this point, Excel will record
everything you do and save it as part of the macro.
- From the View menu, choose
Header And Footer. Click the Custom Footer button.
- Click in the Left Section,
Center Section, Or Right Section box, and type the information you want to
appear in these areas. If you'd like variable information, such as page
numbers, time, date, etc., you can use the buttons at the top of the dialog
box. (Note: Explanations for each button are at the top of the dialog box.
These buttons do not have "tool tips"—explanations that usually
appear in Microsoft products to tell you what a button does.) To format your
text, simply highlight it and click the A button, which will take you to a
Font dialog box (see Figure B).
|
Figure B
|
|
|
- After you've entered the
information for the footer, click OK. You may now click Custom Header and
repeat the process for any information you'd like to appear at the top of
each page. When you've finished entering information for the header, click
OK to return to the Header/Footer dialog box. Then, click OK again.
- The next step is to stop the
macro recording process. You can handle this two ways. Either click Tools |
Macro | Stop Recording, as shown in Figure C, or click the Stop
button on the Macro toolbar (see Figure D).
|
Figure C
|
|
|
|
Figure D
|
|
|
Using the macro
To use the macro on a spreadsheet, perform the following steps:
- Open a new workbook.
- From the Tools menu, choose
Macro | Macros. The Macro dialog box will open.
- In the Macro Name box, click
the name of the macro you want to run. In this example, I’ll choose
HeaderFooter, as shown in Figure E.
- Click Run.
|
Figure E
|
|
|
Viewing the header and footer
To see the fruits of your labor and be sure the macro has worked, you'll need to
view your spreadsheet in Print Preview mode. Note that you cannot go to Print
Preview mode unless you have something in your spreadsheet, so add a few
characters to the blank spreadsheet or open a previously created one.
Then, click the File menu and choose Print Preview. From this view, you'll see a
page-by-page layout of your document. If your header or footer requires more
room on the page, click the Setup button, as shown in Figure F.
|
Figure F
|
|
|
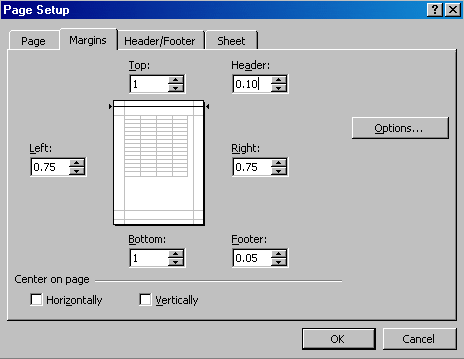
On the Margins tab in the Page Setup dialog box, you can change the margins on
the printed page as well as the area allotted for the header and footer (see Figure
G).
|
Figure G
|
|
|
Tips and tricks from Microsoft
Microsoft offers these tips for creating custom headers and footers:
- To include a single ampersand
(&) within the text of a header or footer, use two ampersands. For
example, to include "Subcontractors & Services" in a header,
type Subcontractors && Services.
- To start numbering pages with
a number other than 1, use &[Page]+ or &[Page]- followed by the
number you want to add or subtract from the actual page number. For example,
to print starting with number 3 on the first page, type &[Page]+2.
To print page 4 with number 3, type &[Page]-1.
- You cannot insert graphics or
cell references in a header or footer. If you want to repeat cell contents
or a graphic on every printed page, search for "print titles" in
the Excel Help Answer Wizard. (Click Help | Microsoft Excel Help.)
Created Date: 03/14/2002 Last Reviewed: 03/14/2002 Rev. Date: